NZXT Kraken Manual: A Comprehensive Guide
NZXT CAM software is crucial for monitoring, tuning, and configuring your Kraken cooler, offering extensive control over performance and aesthetics.
NZXT Kraken series represents a premium line of all-in-one (AIO) liquid coolers designed to deliver exceptional CPU cooling performance with minimal noise. These coolers are renowned for their robust construction, ease of installation, and customizable features, making them a popular choice for both novice and experienced PC builders.
Kraken coolers utilize a closed-loop system, pre-filled with coolant and requiring no maintenance beyond occasional dust removal. They feature a high-density radiator, a powerful pump, and optimized fan designs to efficiently dissipate heat away from the CPU. The integration with NZXT CAM software allows users to monitor temperatures, control fan speeds, customize RGB lighting, and fine-tune pump performance for optimal cooling and quiet operation. The Elite series further enhances this with a stunning LCD display for personalized visuals.
Unboxing and Component Overview
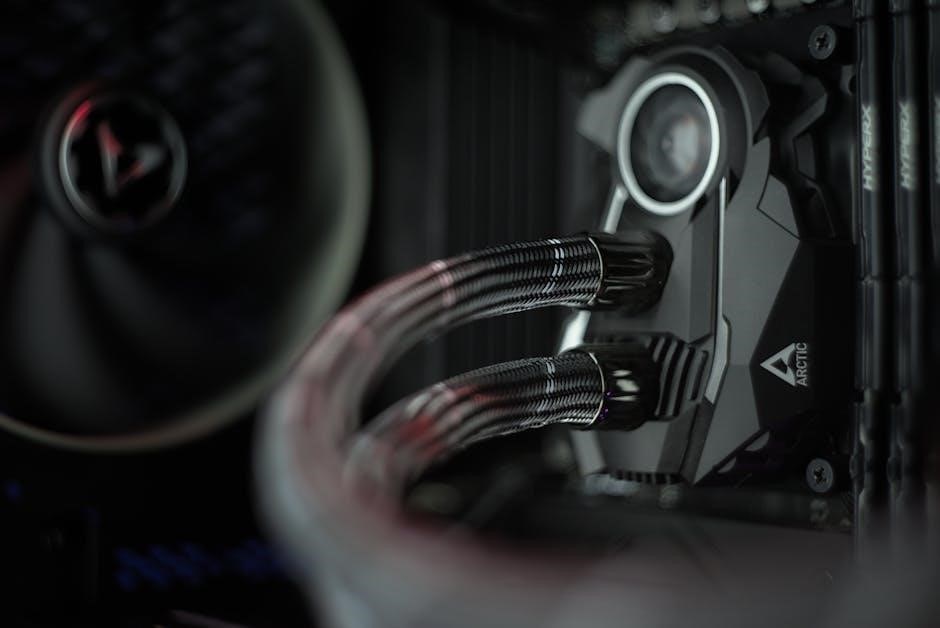
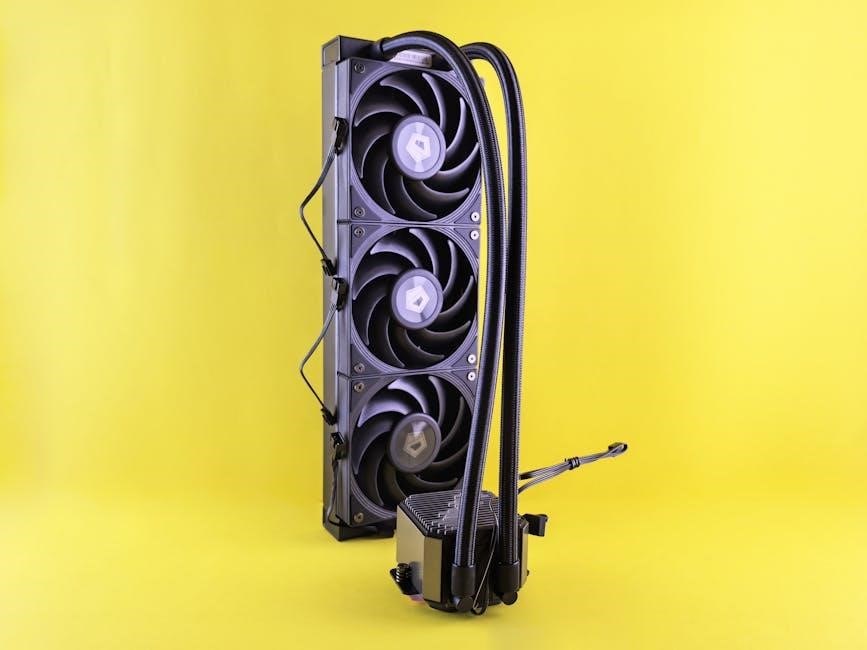
Upon opening your NZXT Kraken, you’ll find several key components. These typically include the radiator, the CPU water block (containing the pump), the fans, mounting brackets for both Intel and AMD CPUs, screws and standoffs, and the necessary cables for power and control. A detailed installation guide is also included.
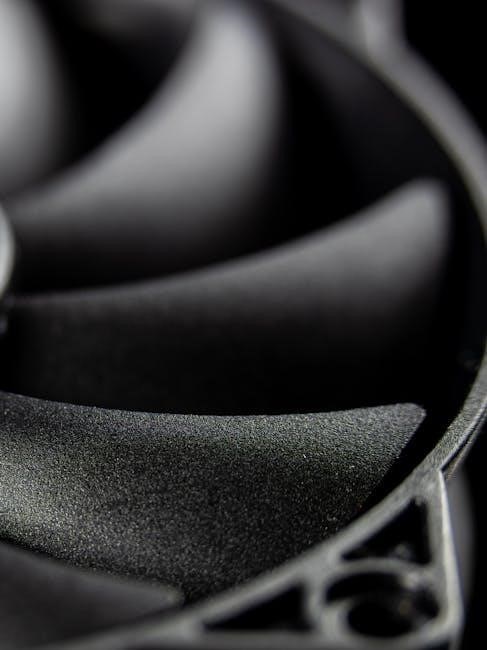
The radiator’s size varies depending on the model (e.g., 240mm, 280mm, 360mm). The water block features a copper cold plate for efficient heat transfer and connects to the radiator via flexible tubing. The fans are designed for high static pressure, optimizing airflow through the radiator. Familiarize yourself with each component before beginning installation, ensuring all parts are present and undamaged. NZXT CAM software integration begins after hardware setup.
Compatibility Check: Radiator and Case
Before installation, verify your case supports the Kraken’s radiator size. Measure the available space for radiator mounting – top, front, or side – and compare it to the radiator’s dimensions (240mm, 280mm, 360mm are common). Ensure sufficient clearance for fans and tubing.
Check your case specifications for maximum CPU cooler height, as the water block adds height. Confirm compatibility with your motherboard and CPU socket (Intel or AMD). NZXT provides compatibility lists on their website. Consider airflow within your case; a well-ventilated case enhances cooling performance. Proper planning prevents installation issues and maximizes the Kraken’s cooling potential.
Mounting the Water Block
Prior to mounting, carefully read the instructions for your specific CPU socket (Intel or AMD). Ensure the motherboard is powered off and the CPU cooler is removed. Apply the included thermal paste evenly to the CPU’s integrated heat spreader (IHS). Align the water block with the mounting holes and secure it using the provided bracket and screws.
Tighten screws in a diagonal pattern to ensure even pressure. Avoid over-tightening, which can damage the CPU or motherboard. Double-check the water block is firmly attached and doesn’t wobble. Proper mounting is crucial for optimal heat transfer and cooling performance.
Intel CPU Mounting
For Intel systems, utilize the appropriate backplate and mounting bracket included with your Kraken cooler. Install the backplate on the rear of the motherboard, aligning it with the CPU socket. Secure it with screws. Then, attach the Intel-specific mounting bracket to the water block.
Carefully align the bracket with the backplate posts and gently lower the water block onto the CPU. Secure with thumbscrews, tightening them diagonally in small increments. Ensure even pressure for optimal contact. Avoid excessive force to prevent damage. Verify a secure and stable fit before proceeding.
AMD CPU Mounting
For AMD platforms, the mounting process differs slightly. Begin by installing the AMD-specific backplate onto the motherboard, ensuring correct alignment with the CPU socket and securing it with screws. Attach the appropriate AMD mounting bracket to the Kraken water block.
Carefully position the water block onto the CPU, aligning the bracket with the backplate. Gently lower it into place and secure it using the provided thumbscrews. Tighten diagonally, applying even pressure to ensure optimal thermal contact. Avoid over-tightening to prevent damage to the CPU or motherboard. Confirm a stable and secure installation.
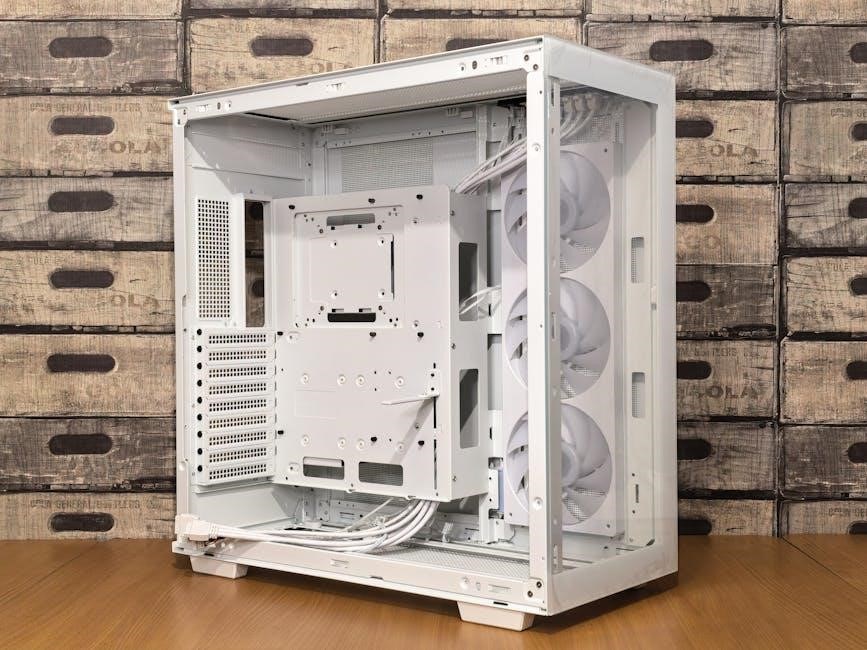
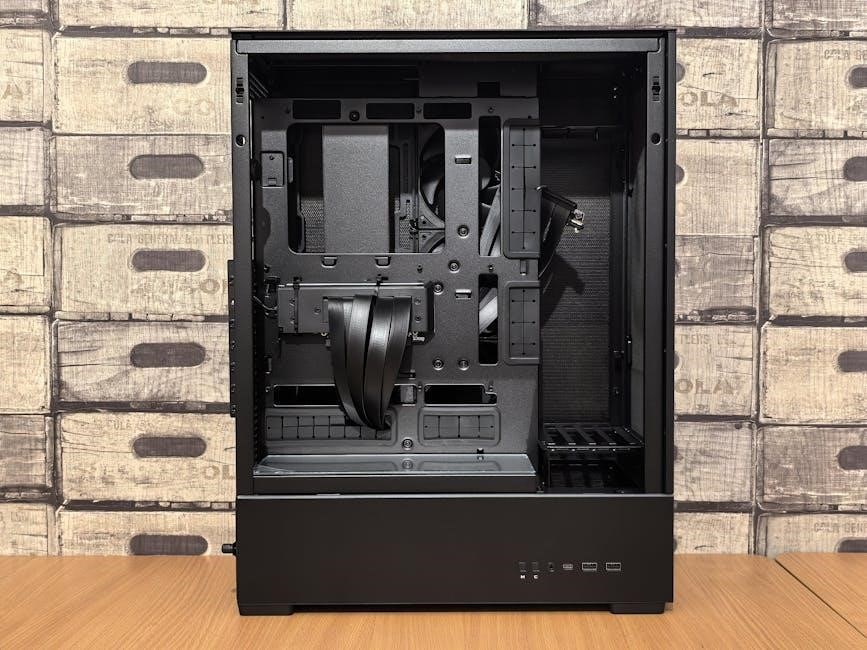
Installing the Radiator
Radiator installation is a critical step for effective cooling. First, identify suitable mounting locations within your case – typically the top or front panel. Ensure sufficient space and compatibility with the radiator’s dimensions. Attach the radiator to the case using the provided screws, ensuring a secure fit.
Proper orientation impacts performance; generally, mounting the radiator with the fans exhausting hot air out of the case is optimal. Consider airflow patterns within your build. Double-check that no components obstruct airflow to or from the radiator. A well-positioned radiator maximizes cooling efficiency.
Radiator Placement Options
Top mounting is a common choice, utilizing natural convection to exhaust heat, but requires case compatibility and sufficient clearance from motherboard components. Front mounting allows for fresh air intake, potentially offering superior cooling, especially with positive case pressure. However, it can impact graphics card temperatures.

Side mounting, if supported by your case, provides another viable option, though airflow may be less direct. Consider the length of the radiator and available space. Evaluate your case’s airflow design to determine the most effective placement for optimal thermal performance. Prioritize unobstructed airflow paths.

Fan Configuration for Optimal Cooling
Push-pull configuration, using fans on both sides of the radiator, maximizes airflow and cooling potential, but increases noise levels and power consumption. Push configuration, with fans only on one side, offers a balance between performance and noise. Ensure fans are oriented correctly to either push or pull air through the radiator fins.
Experiment with fan speeds within the NZXT CAM software to find the optimal balance between cooling performance and noise. Consider using high-static pressure fans designed for radiators to overcome air resistance. Proper fan placement and orientation are crucial for efficient heat dissipation.
Connecting the Pump and Fans
Connecting to the Motherboard allows for fan and pump speed control via BIOS or software like NZXT CAM, utilizing PWM headers for precise adjustments. Ensure correct polarity when connecting the fan cables. Connecting to the PSU provides a simpler power source, but limits control options; use SATA power connectors for the pump and standard Molex or 3-pin fan headers for the fans.
Verify all connections are secure to prevent power issues. The Kraken utilizes a combined pump/fan connector, simplifying the wiring process. Always refer to your motherboard manual for header locations and specifications.
Connecting to the Motherboard
Utilizing PWM headers on your motherboard grants comprehensive control over both pump and fan speeds through the BIOS or NZXT CAM software. This allows for customized fan curves, optimizing cooling performance and noise levels. Ensure proper polarity when connecting the fan cables to avoid damage. Locate the appropriate 4-pin PWM headers, typically labeled “CPU_FAN” or similar.
Connecting the pump to a dedicated pump header (if available) is recommended for independent speed control. If unavailable, a CPU_FAN header can be used, but may limit other control options. Double-check your motherboard manual for specific header locations and wattage limits.
Connecting to the PSU
Directly connecting fans and the pump to your power supply unit (PSU) provides a reliable power source, bypassing motherboard limitations. This is particularly useful if your motherboard lacks sufficient PWM headers or has wattage restrictions. Ensure your PSU has enough available SATA or Molex connectors. Use appropriate adapters if necessary, prioritizing SATA connectors for cleaner cable management.
When connecting directly, fan and pump speeds are typically fixed, lacking the granular control offered by PWM headers. However, this method guarantees consistent power delivery. Always verify the voltage requirements of your Kraken components before connecting to the PSU.
NZXT CAM Software Installation
NZXT CAM is essential for unlocking the full potential of your Kraken cooler. Download the latest version directly from the NZXT website (nzxt.com/cam). The installer is straightforward, guiding you through the setup process. During installation, you may be prompted to create an NZXT account or log in to an existing one. This account allows for cloud syncing of profiles and access to community features.
Ensure your system meets the minimum requirements listed on the NZXT website for optimal performance. After installation, CAM will automatically detect your Kraken cooler, initiating the configuration process.

Navigating the NZXT CAM Interface
NZXT CAM presents a user-friendly interface divided into distinct sections. The ‘Dashboard’ provides a quick overview of system health, including CPU and coolant temperatures, pump speed, and fan RPMs. The ‘Devices’ tab allows direct control over your Kraken cooler, enabling adjustments to fan curves and pump speed. ‘Curves’ is where you’ll fine-tune fan behavior based on temperature thresholds, creating custom cooling profiles.
The ‘Lighting’ section manages RGB customization, offering static color selection and dynamic effects. Explore the ‘Settings’ menu to configure CAM’s behavior and update firmware.
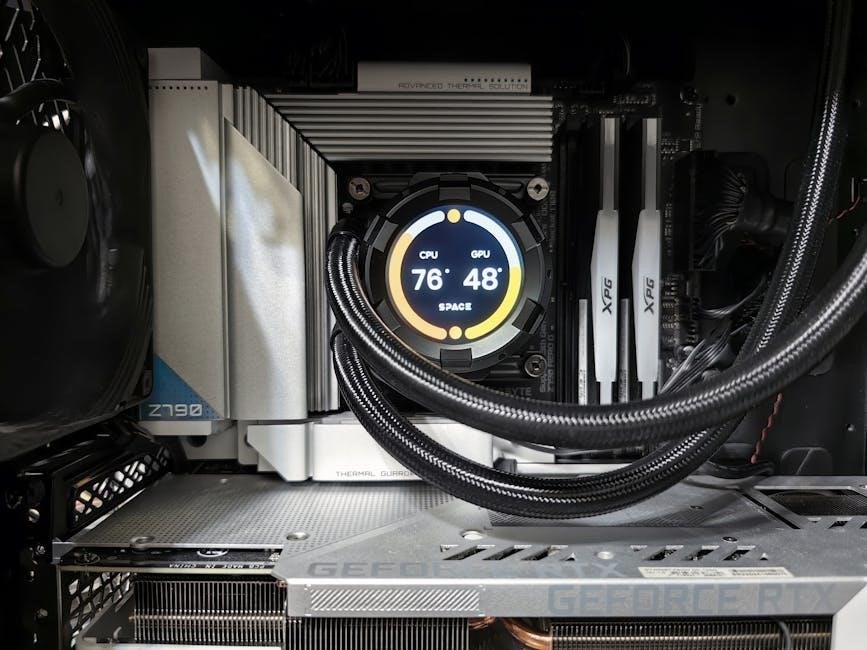
Monitoring Temperatures and Performance
NZXT CAM’s primary function is real-time monitoring. The software displays crucial metrics like CPU temperature, coolant temperature within the Kraken, and pump speed, providing immediate insight into cooling efficiency. Fan RPMs are also visible, allowing you to assess airflow. Historical data is charted, enabling performance trend analysis and identification of potential issues.
Pay close attention to coolant temperature; consistently high readings may indicate a need for adjustments. CAM also reports system load and component utilization, helping correlate performance with cooling effectiveness. Regularly checking these metrics ensures optimal operation.
Customizing Fan Curves
NZXT CAM allows precise control over fan speeds via customizable fan curves. Users can define specific fan RPMs based on coolant temperature, creating a tailored cooling profile. Select from pre-set curves – Silent, Balanced, or Performance – or create a custom curve for optimal noise and cooling balance.
Adjusting the curve points allows prioritizing silence at lower temperatures and aggressive cooling under heavy load; Experimentation is key to finding the ideal settings for your system and case. Remember to test stability after making changes. CAM visually represents the curve, simplifying the adjustment process.
Pump Speed Control
NZXT CAM software provides dedicated control over the Kraken’s pump speed, allowing users to balance cooling performance with noise levels. Adjusting the pump speed impacts coolant flow rate and, consequently, heat dissipation. Higher pump speeds generally improve cooling but can introduce more noise.
The software typically offers a percentage-based adjustment, letting you fine-tune the pump’s operation. Lowering the pump speed can significantly reduce noise, especially during idle or light workloads. Monitor temperatures closely when adjusting pump speed to ensure adequate cooling is maintained. Finding the sweet spot requires experimentation based on your system’s needs.
RGB Lighting Customization
NZXT CAM software offers extensive RGB lighting customization options for Kraken coolers equipped with RGB lighting. Users can select from a vast spectrum of colors to personalize the aesthetic of their build. Beyond static colors, dynamic lighting effects are available, including breathing, pulsing, and color cycling.
The software allows for synchronization with other NZXT RGB components, creating a unified lighting scheme throughout the system. Profiles can be created and saved, enabling quick switching between different lighting setups. Adjust brightness and speed of effects to achieve the desired visual impact. Experimentation is encouraged to find the perfect look!
Static Color Selection
Within NZXT CAM, the static color selection provides a straightforward method for setting a consistent RGB illumination on your Kraken cooler. A color wheel or palette allows precise color picking, offering millions of hues to match your system’s theme. Users can input specific RGB values (Red, Green, Blue) for exact color replication.
Adjusting the brightness level is also possible, ranging from subtle ambient glows to vibrant, eye-catching displays. This feature is ideal for creating a clean, minimalist aesthetic or highlighting specific components within your PC build. Saving custom static color profiles allows for easy recall and switching between preferred looks.
Dynamic Lighting Effects
NZXT CAM unlocks a range of dynamic lighting effects beyond static colors for your Kraken cooler. Options include breathing, color shift, rainbow wave, and strobe, each offering a unique visual experience. Speed and intensity adjustments allow customization of these effects to suit your preferences.
Furthermore, the software enables synchronization with other NZXT RGB components, creating a unified lighting scheme across your entire system. Advanced users can even create custom lighting patterns using the built-in editor, tailoring the effects to specific events or system loads. These dynamic effects add a vibrant and personalized touch to your PC build.
Maintenance and Troubleshooting
Regular maintenance ensures optimal Kraken cooler performance and longevity; Periodically clean the water block and radiator fins with compressed air to remove dust accumulation, preventing reduced cooling efficiency. Inspect tubing for kinks or damage, though the sealed system minimizes leak risks.
Common issues like pump noise can often be resolved by adjusting pump speed within NZXT CAM. If leaks occur (rare), immediately power down and contact NZXT support. Addressing pump noise and ensuring proper airflow are key troubleshooting steps. Always refer to the manual for detailed guidance and warranty information before attempting repairs.
Cleaning the Water Block and Radiator
Routine cleaning of the water block and radiator is vital for maintaining peak cooling performance. Power down the system and disconnect the cooler before commencing. Use compressed air to gently remove dust and debris from the radiator fins, blowing air through them to dislodge particles.
For the water block, a soft brush or microfiber cloth dampened with distilled water can carefully clean the surface. Avoid harsh chemicals or abrasive cleaners. Ensure everything is completely dry before reconnecting. Regular cleaning prevents airflow obstruction and heat buildup, extending the lifespan of your NZXT Kraken cooler.
Addressing Common Issues (Pump Noise, Leaks)
Pump noise can sometimes occur; ensure all fans are securely mounted to minimize vibrations. Adjusting the pump speed via NZXT CAM software can also reduce noise levels. For potential leaks, immediately power down the system and inspect all connections – the water block, radiator hoses, and fittings.
Carefully check for any visible signs of coolant. If a leak is detected, contact NZXT support immediately. Do not attempt to disassemble the cooler yourself, as this will void the warranty. Regular inspection and prompt attention to any unusual sounds or signs of leakage are crucial for preventing damage.
Advanced Configuration Options
Optimizing performance often involves adjusting BIOS settings. Enable XMP for your RAM to ensure it runs at its advertised speed, which can indirectly improve cooling efficiency. Consider enabling CPU core voltage override for fine-tuning, but proceed with caution and research appropriate values for your processor.
Monitoring CPU temperatures within the BIOS can help validate your cooling setup. NZXT CAM allows for advanced fan curve customization, enabling aggressive cooling profiles for demanding tasks or quieter operation during idle periods. Experiment with these settings to find the optimal balance between performance and noise.
BIOS Settings for Optimal Performance
Enabling XMP (Extreme Memory Profile) in your BIOS is crucial for maximizing RAM performance, indirectly aiding overall system stability and potentially reducing CPU load. CPU core voltage adjustments, while advanced, can fine-tune performance; research safe voltage ranges for your specific processor model before making changes.
Monitoring CPU temperatures directly within the BIOS provides a baseline for comparison after installing the Kraken cooler. Ensure your fan control settings are appropriately configured for optimal cooling. Prioritize stability over extreme overclocking, and always test thoroughly after any BIOS modifications.
Warranty Information and Support
NZXT provides a standard warranty for Kraken coolers, typically covering manufacturing defects for a specified period – often 2 to 6 years, depending on the model. Register your product on the NZXT website to activate the warranty and streamline any potential claims. Retain your proof of purchase for warranty service.
For technical support, NZXT offers comprehensive resources including their online knowledge base, FAQs, and community forums. Direct support can be accessed through their website via support tickets or, in some regions, phone support. Ensure you have your cooler’s serial number readily available when contacting support.
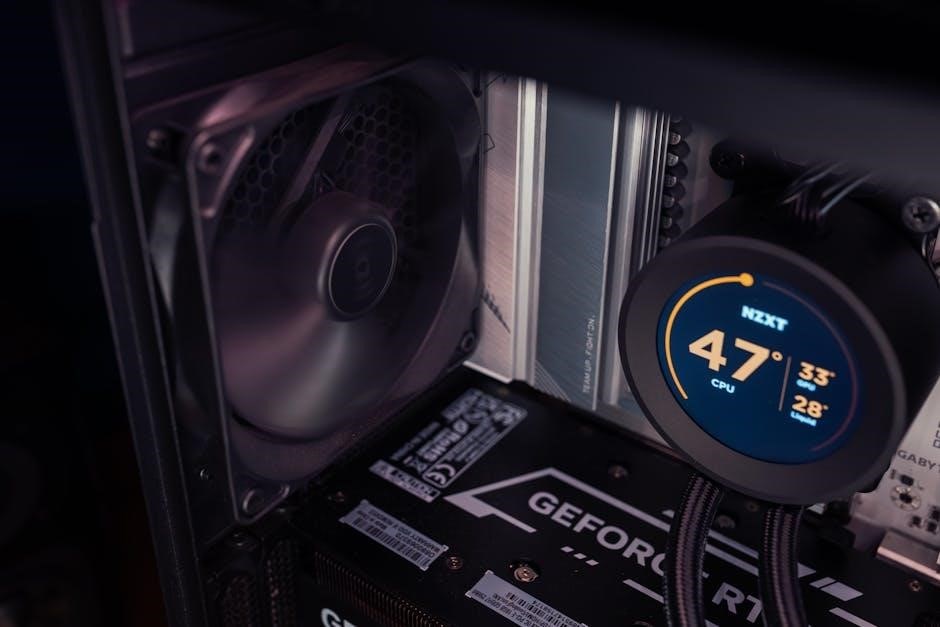
NZXT Kraken Elite Series Specifics
NZXT Kraken Elite models distinguish themselves with a prominent LCD display integrated into the water block. This display is fully customizable via NZXT CAM software, allowing users to showcase system monitoring data, animated GIFs, or personalized images. Software integration extends to advanced control over the display’s brightness and content.
Elite series coolers often feature a refined aesthetic and premium build quality. The display’s functionality requires a USB connection to the motherboard for data transfer and control. Ensure compatibility and proper driver installation for optimal display performance within the NZXT CAM environment.
Display Customization
NZXT CAM software provides extensive options for customizing the LCD display on Kraken Elite series coolers. Users can select from pre-loaded images and animations, or upload their own custom content. Real-time system monitoring data, such as CPU temperature, clock speeds, and fan RPMs, can also be displayed.
Brightness levels are adjustable to suit individual preferences and ambient lighting conditions. The display orientation can be rotated for optimal viewing. Advanced users can explore custom scripting options within NZXT CAM to create unique and dynamic display effects. Regular software updates introduce new customization features and improvements.
Software Integration with Elite Models
NZXT CAM software deeply integrates with the Kraken Elite series, unlocking advanced control features. Beyond standard fan and pump speed adjustments, CAM allows complete customization of the LCD display, showcasing system stats or personalized visuals. The software facilitates firmware updates for the cooler, ensuring optimal performance and compatibility.
NZXT’s ecosystem integration extends to other compatible components, enabling unified control through CAM. Users can synchronize RGB lighting effects across all NZXT devices. Detailed performance monitoring and logging capabilities provide valuable insights into cooling efficiency. The software’s intuitive interface simplifies complex configurations.